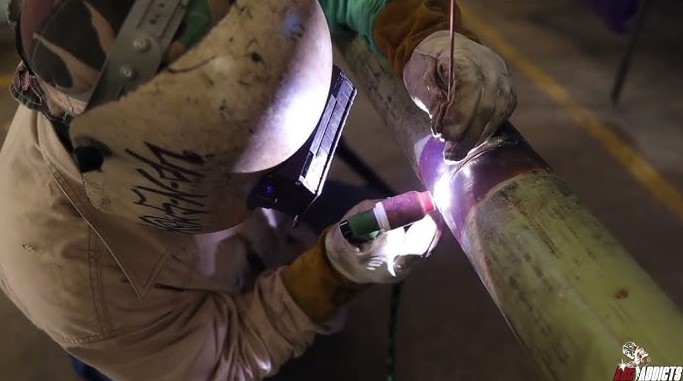
The 5g welding position is a critical skill for pipe welders, requiring the pipe to remain fixed in a horizontal axis while the welder performs an “all-position” weld. Mastering the 5g welding position ensures structural integrity in high-pressure environments like oil pipelines and industrial plumbing systems.
If you are stepping into the world of professional pipe welding in 2026, you have probably heard the term “5g welding position” thrown around quite often. It is a bit of a rite of passage. If you can pass a 5g test, you are telling employers that you have the skills to handle some of the toughest jobs out there. But what exactly makes it so special, and why does it keep so many apprentices up at night?
At its core, the 5g welding position is all about fixed pipe. Imagine a long piece of pipe held horizontally between two supports. It cannot be rotated. Because the pipe is stuck in place, you have to move your body around it. You will be welding at the top, the sides, and underneath. It mimics the real-world conditions where pipes are installed in trenches or high up on racks where they cannot be moved. Let’s break down everything you need to know to master this essential skill.
Understanding the Mechanics of 5g Welding
When we talk about pipe welding positions, the “g” stands for groove. The number “5” indicates the orientation. In the 5g welding position, the pipe axis is fixed in a horizontal plane. Because the pipe does not rotate, gravity becomes your biggest challenge. You aren’t just fighting to get a clean bead; you are fighting to keep the metal exactly where it needs to be while the earth tries to pull it downward.
The Geometry of the Joint
In a standard 5g test, the pipe is placed at a height that allows the welder to get into a comfortable position for the top of the joint, but usually forces them into awkward angles for the sides and the bottom. You are essentially dealing with four distinct zones: the top (flat/overhead depending on the approach), the two sides (vertical up or down), and the bottom (the most difficult overhead section).
Why Rotation Matters (Or Doesn’t)
Unlike the 1g position, where you roll the pipe to keep your torch in the “flat” zone, the 5g welding position forces you to change your technique every few inches. You are constantly adjusting your rod angle, your arc length, and your travel speed. It is a dynamic dance of coordination that separates the hobbyists from the certified professionals.
Mastering Heat Management and Gravity
The biggest hurdle in the 5g welding position is heat. When you are welding the bottom of the pipe, you are fighting gravity. If your puddle gets too hot or too large, the molten metal will simply drip off the pipe. This is known as “sagging” or “dropping out.” You have to keep the puddle small, controlled, and frozen quickly.
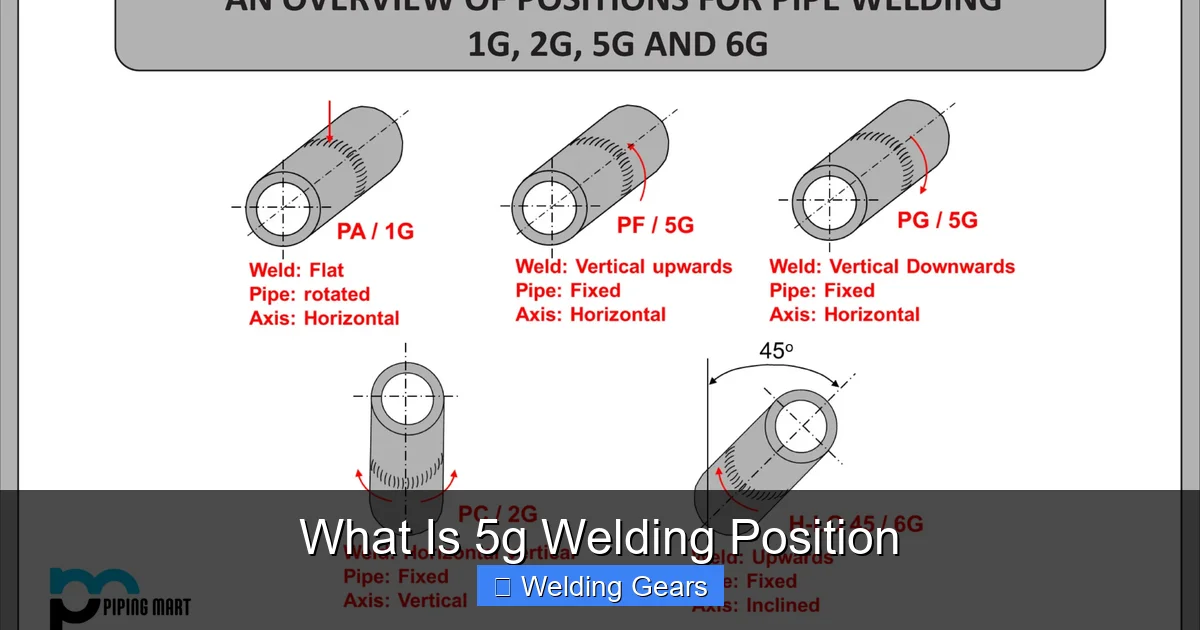
Visual guide about What Is 5g Welding Position
Image source: cdn.thepipingmart.com
Controlling the Puddle
In 2026, we have better technology, but the physics remain the same. You need to use the “whip and pause” or “circular motion” techniques depending on the rod you are using. The goal is to let the metal solidify for a split second before moving to the next spot. If you move too fast, you lose penetration. If you move too slow, you lose your puddle to gravity.
The Importance of Fit-Up
Before you even strike an arc, you need to make sure your fit-up is perfect. A consistent gap (root opening) makes the 5g welding position much easier to manage. If your gap varies, your heat needs will change constantly, which is a nightmare when you are already worried about gravity. Spend the extra time to tack the pipe securely. Use a spacer if you need to, and ensure your alignment is spot-on.
Techniques for Each Section of the Pipe
You can think of the 5g welding position as a series of different skills combined into one. You aren’t just welding one pipe; you are welding four different positions on a single run. As you move around the pipe, you need to adapt your stance and your wrist movement.
The Overhead Section (The Bottom)
The bottom of the pipe is the “test” area for most inspectors. This is where you encounter the most resistance. Use a shorter arc length here. Keep your electrode tip close to the base metal to pull the arc into the joint. Do not try to fill the gap in one pass. It is much better to take several smaller passes to build up the weld.
The Vertical Transitions
As you move from the bottom to the sides, you move into vertical welding. You want to focus your heat on the toes of the weld. This ensures that the metal ties into the pipe walls without undercut. If you see the metal starting to run away, shorten your arc slightly and speed up your travel just a fraction.
Tooling and Preparation in 2026
In the modern era of 2026, welding gear has become more ergonomic. We have lighter torches, more responsive power sources, and better protective gear. However, the basics of the 5g welding position still rely on your personal discipline and preparation. Choosing the right electrode or wire size for the pipe thickness is the first step toward success.
Setting Your Machine
Do not be afraid to adjust your machine as you move around the pipe. Some modern digital welders allow you to save presets. You might find that you prefer a slightly lower amperage for the overhead section compared to the vertical sections. If your machine allows it, utilize these presets to maintain a perfect puddle throughout the entire rotation.
Ergonomics and Safety
Since the 5g welding position requires you to move your body around the pipe, make sure your work area is clear of cables and clutter. Tripping while holding a live torch is a major safety risk. If possible, use a welding stool or a steadying device to keep your hands stable. If you are comfortable, your weld will naturally be smoother.
Common Mistakes to Avoid
Every welder has failed a 5g test at some point. It is how you learn. One of the most common mistakes is ignoring the “tie-in” areas—the spots where you join a new rod to the previous weld. If you don’t clean your slag properly or don’t fuse the new bead into the cold edge of the old one, you will leave a hole or a “wagon track” that will fail an X-ray test every time.
Lack of Penetration
If your root pass doesn’t penetrate all the way through to the inside of the pipe, you won’t pass inspection. You need to ensure that you are seeing that “keyhole” effect on your root pass. If the keyhole closes up, you are likely pushing too hard or your heat is too low.
Over-welding the Cap
Another common mistake is trying to make the cap too wide or too high. Keep it within the limits specified by your welding procedure. An oversized cap doesn’t make the joint stronger; it just adds unnecessary stress and heat to the pipe, which can cause warping or cracking.
Conclusion
The 5g welding position is more than just a technique; it is a demonstration of mastery. By learning to control your arc, manage your heat, and navigate the physical challenges of a fixed pipe, you become a versatile asset to any fabrication crew. As we look ahead in 2026, the demand for high-quality pipe welders remains stronger than ever. The skills you gain from mastering the 5g welding position will open doors to high-paying, challenging, and rewarding projects across the globe.
Remember, there is no shortcut to excellence. Practice on scrap pipe, ask mentors for feedback, and never lose your focus on the puddle. When you can master the 5g welding position, you can confidently walk up to any pipe, in any orientation, and get the job done right. Stay safe, keep your arc steady, and happy welding.
Frequently Asked Questions
What is the difference between 5g and 6g welding?
In the 5g position, the pipe is fixed perfectly horizontal. In the 6g position, the pipe is fixed at a 45-degree angle, which is often considered more difficult because it combines all the challenges of horizontal, vertical, and overhead welding in a single, tilted joint.
Is 5g welding the same as overhead welding?
The 5g welding position includes an overhead section, but it also includes flat, vertical, and horizontal segments as you travel around the circumference of the pipe. Therefore, it is a comprehensive test of all position-based skills rather than just overhead welding.
Why do I keep failing my 5g root pass?
Root pass failures in 5g welding are usually caused by improper keyhole management or uneven heat. Ensure your fit-up is consistent and that you are maintaining a steady, tight arc to keep the penetration balanced throughout the entire circle.
What type of electrode should I use for 5g pipe welding?
For carbon steel pipe, E6010 electrodes are commonly used for the root pass due to their deep penetration and digging action, followed by E7018 electrodes for fill and cap passes for superior strength. Always consult your specific welding procedure specification for the correct choice.
Can I rotate the pipe at all in a 5g test?
No, the 5g welding position specifically requires the pipe to be fixed in place. If you rotate the pipe at any point, you are effectively turning it into a 1g (flat) welding scenario, which would result in an automatic failure of a 5g certification test.
How long does it take to get good at 5g welding?
Mastery depends on your practice habits, but most students require several weeks of consistent, dedicated practice to feel comfortable with the rod manipulation and heat management required for 5g. Focus on high-quality practice reps rather than just the number of hours spent behind the hood.